Sunday, January 22, 2012

Living Room redo

Living Room:

view toward the front and side of the house

View towards side and back of the house

view to the backyard
After - we have a new chair where the rocker is now.
I painted the room a taupe color.


After 
I got the print above the couch for $70 at Mardens.

After
As you can see I painted the fireplace surround with High Heat spray paint (and the fireplace tools). I also spray painted the light fixtures.  I have plans to tile around the fireplace so I wasn't too careful about getting the spray paint on the bricks.  Of course it is 3 years later and I still haven't done it.  I do have the tiles though....step one!  If anyone has suggestions for the tile project I would love the hear them!

Kitchen Before and After


Before removing wallpaper
Kitchen photos when we moved in: 2009

My youngest daughter cleaning the cupboards


corner with light and half bath


Slider to pool area


Did a faux finish on the walls.  Found this light at Home Depot on clearance for $14.99!  I found the bistro set at Mardens for $49.99

We lived like this for awhile until I found the counter-top transformation kit.  (see blog for details)


Then we made more changes this is 9-2010

My daughter today with new floor 1-2012


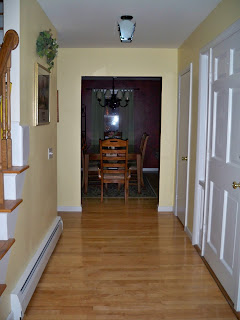
Hallway transformation

Hallway before:

View to Dining Room
View to Living Room


I found some oops paint at Home Depot for $5/gallon and used that in the hallway.  Removed the gold light fixtures and spray painted them black.


After I found hallway table
Before I found hallway table
I found this hallway table at Yard Sale and it seemed perfect, I just needed to paint it black.  That prompted me to paint my Thomas Kincade frame black also. 

I used the black hammered style spray paint


Den Makeover

Our Den - a sitting place for the kids while my husband and I use the living room.

So I had this one room that I REALLY needed to redo, it was BAD.   It was also the room off the kitchen that everyone can see when first walking into the house.  It needed the most work so I kept putting it off.  My husband and I decided that we would do it during my October 2010 vacation.  Well, I changed my plans and decided to visit my sister in Florida so once again I thought I would have to redo the room another time.

Surprise to me I came home from my trip to my room almost all done!  My husband had recruited his friends and provided the pizza and beer for all!  He is sooooo sweet!

This is the room before.....the carpet was stained....it had a drop ceiling, and paneled walls, and no light to be found.  (it was hidden under the drop ceiling)  And that color...UCCCKKKK!!

when we moved in......

how we lived for many years.
This room opens up to our backyard deck and pool area.

This is what I came home to:


Paneling was gone, drop ceiling removed, new wallboard everywhere, carpet ripped up, and new ceiling fan with LIGHT!


I painted the walls a light sage green that was suggested to go with the new curtains I bought to replace the vertical blinds.  You can see how different the paint looks with the light on and off.


Sorry for the lighting...this was from my cell phone.  We also needed a new floor.  I wanted to do it ourselves so I chose this wood laminate floor. Since I was going to be into the project I decided to bring the flooring into my kitchen since I never liked the vinyl flooring. To be honest it may not be the smartest flooring since kids come in from the pool through here and the kitchen slider.  Oh well, I will have to think of something once Summer comes.


My husband and I went to a Holiday Ball/Auction for the Boys & Girls Club.  
We ended up winning the bid for the new furniture.  A couch, loveseat, and chair, two end tables, and coffee table.  ($750)  Found the prints at Mardens for $15 each.


Fell in love with the pillows because of the teal color in them.  It looks great with the brown.  Wanted some type of metal art for this wall that had teal in it.  I looked on ebay and online shops for quite some time without finding much for the amount I wanted to pay.  I ended up getting this one at TJMaxx for a clearance price of $15.  It didn't have any teal so I took some paint that I had at home and distressed it into the metal.  I think I need to get a brighter color to match the pillows though.


Basically the furniture is set the same as before, which I really don't like.  I have all the cables on that one wall so I feel like I am stuck having the TV and computer on the same wall.  It seems too heavy on that wall.  My husband likes the layout  since he watches TV while on the computer.  I would love if anyone has any suggestions.  We use this door to let the dogs out so I don't want to cover that wall.


I was trying that carpet out but decided it didn't go well so I moved it back to our living room.  I am still searching for the perfect carpet with the right colors.
I now feel this room fits with the rest of the house!


Half Bath Redo!

Downstairs Bathroom redo!

I don't know why I waited so long to do this simple project! I think I dreaded the removal of the wallpaper after having such a hard time with the kitchen when we moved in.   It ended up being the easiest removal ever.  All strips came down in one pull!

I found some oops paint at Walmart for $7 with a color that I could live with.  I removed the old light fixture and replaced with a light that was the most expensive thing in this redo.


I went shopping at the Christmas Tree shop and found the prints and some things for the shelf.


This shelf I bought for .75 at a Thrift shop.  I painted it black.  


I love the cabinet that came in this bathroom.  This is where I store all of the cleaning supplies.  Extra paper towels, toilet paper, and magazines!


DIY Painted Faux Tile Backsplash

Okay, now for the Backsplash!

I decided to enter in a contest that the Modern Masters Counter-top Transformation company was having.  It basically wanted you to redo your kitchen with that product and be creative with your kitchen redo by using paint.  So instead of installing a backsplash, I wanted to paint it....to get more credit.  I really like travertine tile so I was trying to do something with light browns.  I think it came out too light, but I still like it.  Having done this project over 2 years ago I may forget some steps in explaining.

1.  Decide your grout color and paint the wall of your backsplash that color.  I chose a grey to compliment the new counter-tops.
2.  It took me awhile to decide the design.  I used a sample board and set it up against the counter to see what it looked like.  Here I was testing out a subway tile design.  I didn't like it.  I wanted to do something so I could have some accent tiles.  

3.  I knew I wanted an accent above the stove so that really determined the sizes of the tiles that I went with.  I got a template of the tile and started drawing on the way with a pencil.  I then started the LONG taping process.  


4.  I had to cut the tape out of the accent piece so I wouldn't have an X in spot.  The next step was to cover the wall with joint compound.  I just used a putty knife and went to town!


As you can see I am a messy worker.  Again, this contest was all about paint. I tried the grey and also a green.  Blah...green was not the color, in my opinion so I stuck with the grey that I used as the grout color.  


5.  If I remember correctly you do NOT wait until the joint compound is totally dry before removing the painter's tape.  If it is so moist you will pull some compound away from wall. If it is too dry you might not get tape off.  After all tape is off let it dry for a day and then RE-TAPE!  I know pain in the behind but I wanted it to be easier when painting.


6.  I used small acrylic paints that I had in different shades of tan and whites.  I painted the accent pieces in black.


7.  After all the painting was done, I used many coats of Venitian plaster topcoat.


8.  In addition to this backsplash and the counter-tops I also painted one of our cabinets with chalkboard paint.  

I replaced the big ceiling light with track lighting that I found at a yard sale for $15.  I painted the curtain rod black and changed all the cabinet knobs with ones I found at Mardens for .99 each.  Not all of them were black so I painted them all with Black Hammered Spray paint. 


I also changed two of my recessed lights into pendant lights by finding these two hanging pieces on ebay with no bulbs.  They came silver but I spray painted them black.   I found the globes at Home Depot.  


I was pretty bummed about not winning the contest but the winners definitely deserved to win.  They all made larger changes by actually painting their cabinets.  Believe me, I was tempted but really don't mind the white.  I have yet again made changes since this picture from 2009.  Added some Hardwood Laminate flooring in 2011.  But, that will be a new post!


New DIY counter-tops

Have you ever had white laminate counter-tops?  Did you hate them as much as I did?  Well I was told of a product that could make my laminate counter-tops look ten times better without replacing them.  After a couple of years of wishing, I was on Facebook and Lowes posted a status indicating that they would be selling the Modern Masters Counter-top Transformation Kit for 1/2 price for a limited time.  I followed their link and bought one right away.  It only cost me $150.
Here is my kitchen before:   June 2010


I then convinced my hubby to help me with the task as it is easiest when two people can work on it. 
1. Sand down the counter-tops with a special sandpaper sponge.  Fill in any dings or imperfections with putty and let dry before painting.
2. Tape off counter-top and paint with the special paint, do a small section at a time while the other person is applying the granite chips.


  It will be a little messy! We applied plastic to the front of all the counters for protection.


 My cute daughter wrote this!
4. After letting the granite chips stay on overnight, lightly brush off the remaining chips.  You should be left with a counter-top that looks great but is not smooth.  At this time you carefully inspect all of the surfaces to make sure it has been covered with chips. If not, lightly brush on more paint and add more chips.  Be careful to not put paint on too thick since you will be lightly sanding the surface to make it smooth.  

5.  After sanding the surface you will be applying the Epoxy clear coat with smooth surface paint roller and a paint brush for the edges.


Viola!  A much better looking counter-top that I don't have to bleach anymore!!!
Next project is the Faux Tile Backsplash!